Wie exportiert man alle Bilder aus Excel gleichzeitig?
Angenommen, Sie haben viele Bilder in Ihrer Arbeitsmappe und möchten sie alle auf einmal in einen bestimmten Ordner speichern. Normalerweise können Sie die Bilder einzeln manuell kopieren und einfügen, um sie zu speichern – dies ist jedoch zeitaufwendig, wenn Sie dies wiederholt tun müssen. Im Folgenden stelle ich Ihnen einige Tipps vor, um diese Aufgabe zu lösen.
Alle Bilder gleichzeitig aus Excel mit der Funktion „Speichern unter“ exportieren
Mithilfe der integrierten Excel-Funktion Speichern unter können Sie eine Arbeitsmappe als Webseite speichern, um alle Bilder – einschließlich Diagramme, Formen und anderer Objekte – in einem Ordner zu sichern. Gehen Sie dazu wie folgt vor:
1. Öffnen Sie die Arbeitsmappe mit den Bildern, die Sie speichern möchten. Klicken Sie auf Datei > Speichern unter > Durchsuchen.

2. Wählen Sie im Dialogfeld Speichern unter Folgendes aus:

3. Klicken Sie im erscheinenden Microsoft Excel-Dialogfeld auf die Schaltfläche Ja.

4. Öffnen Sie den Ordner, in dem die exportierten Dateien gespeichert wurden. Darin finden Sie einen Unterordner mit einer HTML-Dateiliste – alle Bilder der Arbeitsmappe, einschließlich Diagramme, Formen und anderer Objekte, sind dort abgelegt.

5. Behalten Sie die benötigten Bilder im Ordner und löschen Sie die übrigen.
Alle Bilder mühelos gleichzeitig aus Excel mit einem erstaunlichen Tool exportieren
Die oben beschriebene Methode extrahiert alle Objekte aus der Arbeitsmappe – möglicherweise auch solche, die Sie nicht benötigen. Wenn Sie Kutools für Excelin Excel installiert haben, hilft Ihnen die Diagramm exportieren-Funktion, ausschließlich die gewünschten Bilder zu speichern.
1. Klicken Sie auf KUTOOLS PLUS > Import/Export > Diagramm exportieren:

2. Konfigurieren Sie im Dialogfeld Diagramm exportieren Folgendes:
 , um Ordner auswählen für Ihre exportierten Bilder festzulegen;
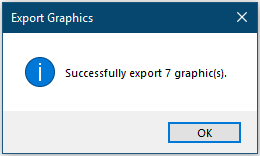
3. Anschließend erscheint ein Dialogfeld mit der Information, wie viele Bilder erfolgreich exportiert wurden. Klicken Sie auf die Schaltfläche OK.
Nun können Sie zum Zielordner wechseln und die Bilder exportieren überprüfen.
Klicken Sie auf Diagramm exportieren, um weitere Informationen zu dieser Funktion zu erhalten.
Bevor Sie Kutools für Excel verwenden, laden Sie es bitte zunächst herunter und installieren.
Bilder exportieren und benennen Sie sie automatisch mit den Werten der benachbarten Zellen
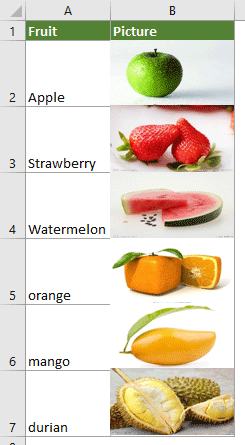
Wie im folgenden Screenshot dargestellt, enthält das Arbeitsblatt zwei Spalten: Eine enthält eine Liste mit Obstnamen, die andere die entsprechenden Bilder dazu. Um diese Bilder zu exportieren und automatisch mit den zugehörigen Obstnamen zu benennen, können Sie den VBA-Code in diesem Abschnitt verwenden.
1. Drücken Sie im Arbeitsblatt, aus dem Sie die Bilder exportieren möchten, die Tastenkombination Alt+F11, um das Fenster Microsoft Visual Basic for Applications zu öffnen.
2. Klicken Sie im Fenster Microsoft Visual Basic for Applications auf Einfügen > Modul. Kopieren Sie anschließend den folgenden VBA-Code in das Modulfenster.
VBA-Code: Bilder aus einer Spalte exportieren und automatisch benennen
Sub ExportImages_ExtendOffice()
'Updated by Extendoffice 20220308
    Dim xStrPath As String
    Dim xStrImgName As String
    Dim xImg As Shape
    Dim xObjChar As ChartObject
    Dim xFD As FileDialog
    Set xFD = Application.FileDialog(msoFileDialogFolderPicker)
    xFD.Title = "Please select a folder to save the pictures" & " - ExtendOffice"
    If xFD.Show = -1 Then
       xStrPath = xFD.SelectedItems.Item(1) & "\"
    Else
        Exit Sub
    End If

    On Error Resume Next
    For Each xImg In ActiveSheet.Shapes
        If xImg.TopLeftCell.Column = 2 Then
        xStrImgName = xImg.TopLeftCell.Offset(0, -1).Value
        If xStrImgName <> "" Then
            xImg.Select

            Selection.Copy
            Set xObjChar = ActiveSheet.ChartObjects.Add(0, 0, xImg.Width, xImg.Height)
            With xObjChar
                .Border.LineStyle = xlLineStyleNone
                .Activate
                ActiveChart.Paste
                .Chart.Export xStrPath & xStrImgName & ".png"
                .Delete
            End With
        End If
        End If
    Next
End Sub
Hinweise:
3. Drücken Sie die Taste F5, um den Code auszuführen. Wählen Sie im geöffneten Fenster „Ordner auswählen“ zum Speichern der Bilder und klicken Sie dann auf OK.

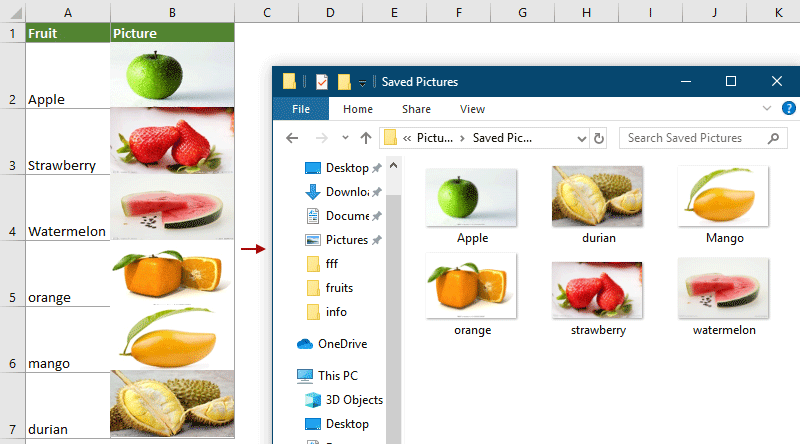
Anschließend werden alle Bilder aus der angegebenen Spalte exportiert und automatisch entsprechend den Werten der benachbarten Zellen benannt – ganz wie von Ihnen festgelegt.
Verwandter Artikel:
Wie exportiert man Diagramme als Grafiken in Excel?
Beste Office-Produktivitätstools
Verbessern Sie Ihre Excel-Kenntnisse mit Kutools für Excel und erleben Sie Effizienz wie nie zuvor.Kutools für Excel bietet über 300 erweiterte Funktionen zur Steigerung der Produktivität und Zeit sparen.Klicken Sie hier, um die Funktion zu erhalten, die Sie am dringendsten benötigen...
Office Tab bringt eine tabbasierte Oberfläche in Office und macht Ihre Arbeit viel einfacher
- Aktivieren Sie tabbasiertes Bearbeiten und Lesen in Word, Excel, PowerPoint, Publisher, Access, Visio und Project.
- Öffnen und erstellen Sie mehrere Dokumente in neuen Registerkarten desselben Fensters – statt jedes in einem separaten Fenster zu öffnen.
- Steigert Ihre Produktivität um 50 % und erspart Ihnen täglich Hunderte von Mausklicks!
Alle Kutools-Add-Ins – ein Installationsprogramm
Kutools for Office-Paket bündelt Add-Ins für Excel, Word, Outlook und PowerPoint sowie Office Tab Pro – ideal für Teams, die mit mehreren Office-Anwendungen arbeiten.
- Alles-in-einem-Paket— Add-Ins für Excel, Word, Outlook & PowerPoint sowie Office Tab Pro
- Ein Installationsprogramm, eine Lizenz— innerhalb weniger Minuten eingerichtet (MSI-fähig)
- Funktioniert besser zusammen— optimierte Produktivität über alle Office-Anwendungen hinweg
- 30-tägige Vollversion zum Testen— keine Registrierung, keine Kreditkarte erforderlich
- Bestes Preis-Leistungs-Verhältnis— sparen Sie im Vergleich zum Kauf einzelner Add-Ins