Direkt zum Inhalt

Wie werden Gitterlinien beim Füllen von Farben in Excel beibehalten?

Wie wir alle wissen, werden beim Füllen der Hintergrundfarbe in Zellen auch die Gitterlinien abgedeckt. In diesem Fall können wir die Gitterlinien beim Füllen der Hintergrundfarbe in Excel-Zellen beibehalten, um den folgenden Screenshot zu erhalten.
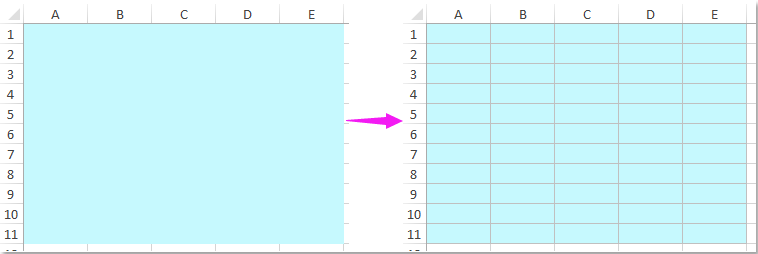
doc halten Gitterlinien Füllfarbe 1

Behalten Sie die Gitterlinien bei, während Sie die Farbe mit VBA-Code füllen


Pfeil blau rechte Blase Behalten Sie die Gitterlinien bei, während Sie die Farbe mit VBA-Code füllen

Normalerweise gibt es für uns keine direkte Möglichkeit, diesen Job zu lösen, aber hier kann ich einen VBA-Code für Sie einführen. Bitte gehen Sie wie folgt vor:

1. Halten Sie die Taste gedrückt ALT + F11 Schlüssel zum Öffnen der Microsoft Visual Basic für Applikationen Fenster.

2. In der linken Projekt-VBAProject Doppelklicken Sie DiesesWorkbook unter dem erweiterten VBAProjektKopieren Sie dann den folgenden VBA-Code und fügen Sie ihn in das leere Modul ein:

VBA-Code: Beibehalten der Gitterlinien beim Füllen der Farbe

Dim xRgPre As Range
Private Sub Workbook_SheetSelectionChange(ByVal Sh As Object, ByVal Target As Range)
    On Error Resume Next
    If Not xRgPre Is Nothing Then DrawBorders xRgPre
    Set xRgPre = Target
End Sub
Private Sub DrawBorders(ByVal Rg As Range)
'Updateby Extendoffice 20160725
    Dim xCell As Range
    Application.ScreenUpdating = False
    For Each xCell In Rg
        If xCell.Interior.ColorIndex = xlNone Then
            With xCell.Borders
                If .ColorIndex = 15 Then
                    .LineStyle = xlNone
                End If
            End With
        Else
            With xCell.Borders
                If .LineStyle = xlNone Then
                    .Weight = xlThin
                    .ColorIndex = 15
                End If
            End With
        End If
    Next
    Application.ScreenUpdating = True
End Sub

doc halten Gitterlinien Füllfarbe 2

3. Speichern und schließen Sie dann das Codefenster. Wenn Sie jetzt eine Farbe für einen Zellbereich eingeben, werden die Gitterlinien automatisch angezeigt.

Beste Office-Produktivitätstools

🤖 Kutools KI-Assistent: Revolutionieren Sie die Datenanalyse basierend auf: Intelligente Ausführung   |  Code generieren  |  Erstellen Sie benutzerdefinierte Formeln  |  Analysieren Sie Daten und erstellen Sie Diagramme  |  Rufen Sie Kutools-Funktionen auf...
Beliebte Funktionen: Suchen, markieren oder identifizieren Sie Duplikate   |  Leere Zeilen löschen   |  Kombinieren Sie Spalten oder Zellen, ohne Daten zu verlieren   |   Runde ohne Formel ...
Super-Lookup: VLookup mit mehreren Kriterien    VLookup mit mehreren Werten  |   VLookup über mehrere Blätter hinweg   |   Unscharfe Suche ....
Erweiterte Dropdown-Liste: Erstellen Sie schnell eine Dropdown-Liste   |  Abhängige Dropdown-Liste   |  Mehrfachauswahl Dropdown-Liste ....
Spaltenmanager: Fügen Sie eine bestimmte Anzahl von Spalten hinzu  |  Spalten verschieben  |  Schalten Sie den Sichtbarkeitsstatus ausgeblendeter Spalten um  |  Vergleichen Sie Bereiche und Spalten ...
Ausgewählte Funktionen: Rasterfokus   |  Designansicht   |   Große Formelleiste    Arbeitsmappen- und Blattmanager   |  Ressourcen (Autotext)   |  Datumsauswahl   |  Arbeitsblätter kombinieren   |  Zellen verschlüsseln/entschlüsseln    Senden Sie E-Mails nach Liste   |  Superfilter   |   Spezialfilter (Filter fett/kursiv/durchgestrichen...) ...
Top 15 Toolsets12 Text Tools (Text hinzufügen, Zeichen entfernen, ...)   |   50+ Chart Typen (Gantt-Diagramm, ...)   |   40+ Praktisch Formeln (Berechnen Sie das Alter basierend auf dem Geburtstag, ...)   |   19 Einfügen Tools (QR-Code einfügen, Bild aus Pfad einfügen, ...)   |   12 Umwandlung (Conversion) Tools (Zahlen zu Wörtern, Currency Conversion, ...)   |   7 Zusammenführen & Teilen Tools (Erweiterte Zeilen kombinieren, Zellen teilen, ...)   |   ... und mehr

Verbessern Sie Ihre Excel-Kenntnisse mit Kutools für Excel und erleben Sie Effizienz wie nie zuvor. Kutools für Excel bietet über 300 erweiterte Funktionen, um die Produktivität zu steigern und Zeit zu sparen.  Klicken Sie hier, um die Funktion zu erhalten, die Sie am meisten benötigen ...

Beschreibung


Office Tab Bringt die Oberfläche mit Registerkarten in Office und erleichtert Ihnen die Arbeit erheblich

  • Aktivieren Sie das Bearbeiten und Lesen von Registerkarten in Word, Excel und PowerPoint, Publisher, Access, Visio und Project.
  • Öffnen und erstellen Sie mehrere Dokumente in neuen Registerkarten desselben Fensters und nicht in neuen Fenstern.
  • Steigert Ihre Produktivität um 50 % und reduziert jeden Tag Hunderte von Mausklicks für Sie!
Comments (19)
No ratings yet. Be the first to rate!
This comment was minimized by the moderator on the site
Is this universally and automatically applied to new tables or sheets opened? Or need to do this for each table or sheet you want to have it? How to make it universally and automatically applied to new tables or sheets?
This comment was minimized by the moderator on the site
Simply change MS Office to Open Office...
This comment was minimized by the moderator on the site
Danke für den super Tipp!
This comment was minimized by the moderator on the site
This works great. (Thanks) But here's the real question - Why does Excel allow gridlines to disappear when filling cells with color in the first place? Just another dumb glitch in the techy world that so-called intelligent developers never think of. I mean, the gridlines, by default are supposed to be there anyway...so....
This comment was minimized by the moderator on the site
Thank you! I was pulling hairs trying to get the nice grey-ish borders to stay after colorizing. Can't believe Microsoft hasn't already implemented this.
This comment was minimized by the moderator on the site
Another fix, if you don't want to mess with code:
First figure out which color gray matches the default lines and have it in mind.
In the Home tab click Cell styles, right click on Normal, click Modify -> Format -> Border. For Line Color, select that gray. For Presets, select Outline. Done.
Now you may have to select all (CTRL+A / Command+A) and click Cell styles -> Normal to make sure it's applied to all cells. When you fill a cell, the borders will remain.
This comment was minimized by the moderator on the site
Very helpful- thank you
This comment was minimized by the moderator on the site
This helped me SO much. I have literally been searching so many places and this is the only explanation that worked! Thank you!!!
This comment was minimized by the moderator on the site
Alissa , I had the same problem couldn`t get it fixed but your reply helped me a lot , so thank you very much , you are genius .
This comment was minimized by the moderator on the site
Thank you!!
This comment was minimized by the moderator on the site
Cool, but now if I fill some cells, and hit Ctrl+Z to undo, it won't work. Will not undo.
This comment was minimized by the moderator on the site
Hello, Andrew,
Yes, the above code can not support Undo feature, you should fill no color manually to undo your work.
Thank you!
This comment was minimized by the moderator on the site
use only standard colors ;)
This comment was minimized by the moderator on the site
works but one has to correct the error if you see it.
Dim xRgPre As Range
Private Sub Workbook_SheetSelectionChange(ByVal Sh As Object, ByVal Target As Range)
On Error Resume Next
If Not xRgPre Is Nothing Then DrawBorders xRgPre
Set xRgPre = Target


*************************************
Should READ... as the If statement only ensures that something is there to set to memory allocation.

One could set the next line below for clean up and not allow memory leaks.

Private Sub Workbook_SheetSelectionChange(ByVal Sh As Object, ByVal Target As Range)
On Error Resume Next
Set xRgPre = Target
If Not xRgPre Is Nothing Then DrawBorders xRgPre
'For ensured memory leaks do not happen
'Clean up the memory allocated after it is not needed.
Set xRqPre = Nothing


Have a nice day..
This comment was minimized by the moderator on the site
Does not work with Conditional Formatting. Set xRqPre = Nothing gives error: variable not defined (deleted the line).Screen jiggles here too, using 2010. Other wise its a cool tool..
This comment was minimized by the moderator on the site
Works fine, but sadly every time I now click on a cell, the worksheet judders! Removed the VBA and the judder has ceased. Wonder why this should happen?
This comment was minimized by the moderator on the site
Same here with Excel 2016. I'm getting freezing and mostly blanked out screen for several seconds, especially when selecting many cells. It's a shame because it does work perfectly otherwise.
This comment was minimized by the moderator on the site
Hi, Vic,
There is no this problem in my Excel workbook, which Excel version do you use?
There are no comments posted here yet
Load More
Please leave your comments in English
Posting as Guest
×
Rate this post:
0   Characters
Suggested Locations