Wie erstellt man Outlook-Erinnerungen aus einer Excel-Tabelle?
Dieser Artikel zeigt Ihnen, wie Sie Outlook-Erinnerungen basierend auf Daten aus einer Excel-Tabelle erstellen.
Erstellen Sie Outlook-Erinnerungen aus einer Excel-Tabelle mithilfe von VBA-Code
Erstellen Sie Outlook-Erinnerungen aus einer Excel-Tabelle mithilfe von VBA-Code
Möchten Sie Outlook-Erinnerungen direkt aus Excel erstellen, gehen Sie folgendermaßen vor:
1. Erstellen Sie ein Arbeitsblatt mit den Spaltenüberschriften und den zugehörigen Erinnerungsfeldern, wie in der folgenden Abbildung dargestellt.

Hinweis: In der Spalte „Beschäftigungsstatus“ steht die Zahl „2“ dafür, dass die Erinnerung in Ihrem Outlook-Kalender als „Beschäftigt“ angezeigt wird. Bei Bedarf können Sie diesen Status in „1 (Vorläufig)“, „3 (Abwesend)“, „4 (Arbeitet woanders)“ oder „5 (Frei)“ ändern.
2. Drücken Sie „Alt“ + „F11“, um das Fenster „Microsoft Visual Basic for Applications“ zu öffnen.
3. Klicken Sie im Fenster „Microsoft Visual Basic for Applications“ auf „Einfügen“ > „Modul“ und fügen Sie anschließend den folgenden VBA-Code in das Code-Fenster ein.
VBA-Code: Erstellen Sie Outlook-Erinnerungen aus einer Excel-Tabelle
Sub AddAppointments()
'Update by Extendoffice 20180608
    Dim I As Long
    Dim xRg As Range
    Dim xOutApp As Object
    Dim xOutItem As Object
    Set xOutApp = CreateObject("Outlook.Application")
    Set xRg = Range("A2:G2")
    For I = 1 To xRg.Rows.Count
        Set xOutItem = xOutApp.CreateItem(1)
        Debug.Print xRg.Cells(I, 1).Value
        xOutItem.Subject = xRg.Cells(I, 1).Value
        xOutItem.Location = xRg.Cells(I, 2).Value
        xOutItem.Start = xRg.Cells(I, 3).Value
        xOutItem.Duration = xRg.Cells(I, 4).Value
        If Trim(xRg.Cells(I, 5).Value) = "" Then
            xOutItem.BusyStatus = 2
        Else
            xOutItem.BusyStatus = xRg.Cells(I, 5).Value
        End If
        If xRg.Cells(I, 6).Value > 0 Then
            xOutItem.ReminderSet = True
            xOutItem.ReminderMinutesBeforeStart = xRg.Cells(I, 6).Value
        Else
            xOutItem.ReminderSet = False
        End If
        xOutItem.Body = xRg.Cells(I, 7).Value
        xOutItem.Save
        Set xOutItem = Nothing
    Next
    Set xOutApp = Nothing
End Sub
Hinweis: Im obigen Code steht „A2:G2“ für den Datenbereich, auf dessen Grundlage Sie Termine erstellen möchten.
4. Drücken Sie „F5“ oder klicken Sie auf die Schaltfläche „Ausführen“, um den Code zu starten – anschließend werden alle Termine mit den angegebenen Feldern auf einen Schlag in Ihren Outlook-Kalender eingefügt.
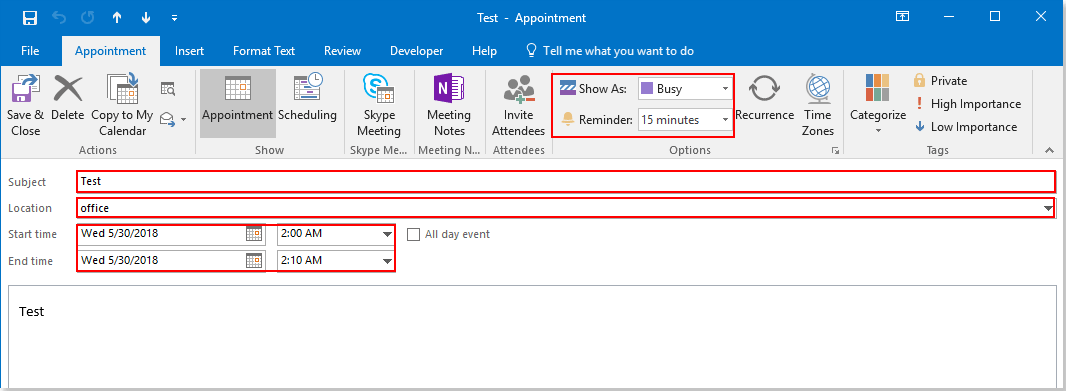
Anschließend können Sie die Ergebnisse direkt in Ihrem Outlook-Kalender anzeigen. Siehe Abbildung:
Beste Office-Produktivitätswerkzeuge
Erleben Sie das komplett neue Kutools für Outlook mit 100+ unglaublichen Funktionen!Jetzt zum Download klicken!
📧E-Mail-Automatisierung: Automatische Antworten (verfügbar für POP und IMAP) / E-Mails zeitgesteuert versenden / Beim Senden automatisch CC/BCC basierend auf Regeln hinzufügen / Automatische Weiterleitung (Erweiterte Regeln) / Automatische Grußformel einfügen / Mehrfachadressierte E-Mails automatisch in Einzelnachrichten aufteilen …
📨E-Mail-Verwaltung: E-Mails zurückrufen, Betrugs-E-Mails anhand von Betreffzeilen und weiteren Kriterien blockieren, doppelte E-Mails löschen, Erweiterte Suche, Ordner organisieren …
📁Anhänge Pro: Stapelweise speichern / Stapelweise lösen / Stapelweise komprimieren / Automatisch speichern / Automatisch abtrennen / Automatische Komprimierung …
🌟Oberflächenzauber:😊Noch mehr hübsche und coole Emojis/Benachrichtigung bei wichtigen eingehenden E-Mails/Outlook minimieren statt schließen...
👍Ein-Klick-Wunder: Allen mit Anhängen antworten / Anti-Phishing-E-Mails / 🕘Aktuelle Uhrzeit der Absender-Zeitzone anzeigen...
👩🏼🤝👩🏻Kontakte & Kalender:Stapelweise Kontakte aus ausgewählten E-Mails hinzufügen/Eine Kontaktgruppe in einzelne Kontakte aufteilen/Geburtstagserinnerung entfernen...
Nutzen Sie Kutools in Ihrer bevorzugten Sprache – mit Unterstützung für Englisch, Spanisch, Deutsch, Französisch, Chinesisch und über 40 weitere Sprachen!


🚀 Ein-Klick-Download – Holen Sie sich alle Office-Add-Ins
Stark empfohlen: Kutools for Office (5-in-1)
Mit einem Klick fünf Installationsprogrammegleichzeitig herunterladen –Kutools für Excel, Outlook, Word, PowerPointund Office Tab Pro.Jetzt zum Download klicken!
- ✅Ein-Klick-Komfort: Laden Sie alle fünf Installationspakete mit nur einem Klick herunter.
- 🚀Bereit für jede Office-Aufgabe: Installieren Sie die Add-Ins, die Sie brauchen – genau dann, wenn Sie sie benötigen.
- 🧰Enthalten: Kutools für Excel / Kutools für Outlook / Kutools für Word / Office Tab Pro / Kutools for PowerPoint