Wie druckt man Anhänge automatisch, sobald E-Mails in Outlook eingehen?
Dieses Tutorial zeigt eine Methode, bei der ein VBA-Skript und eine Outlook-Regel kombiniert werden, um Anhänge bestimmter E-Mails automatisch zu drucken, sobald sie in Outlook eingehen.
Anhänge automatisch drucken, sobald bestimmte E-Mails eingehen
Angenommen, Sie möchten Anhänge eingehender E-Mails eines bestimmten Absenders automatisch drucken – so geht’s:
Schritt 1: Erstellen eines Skripts in Outlook
Zunächst erstellen Sie ein VBA-Skript in Outlook.
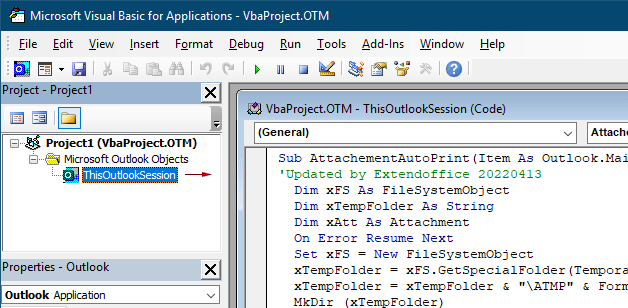
1. Starten Sie Outlook und drücken Sie gleichzeitig die Tasten Alt+F11, um das Fenster Microsoft Visual Basic für Applikationen zu öffnen.
2. Doppelklicken Sie im Fenster Microsoft Visual Basic für Applikationen auf Projekt1 > Microsoft Outlook-Objekte > ThisOutlookSession, um das Fenster ThisOutlookSession (Code) zu öffnen, und fügen Sie dann den folgenden Code in dieses Codefenster ein.
VBA-Code 1: Anhänge (alle Arten von Anhängen) automatisch drucken, sobald E-Mails eingehen
Sub AttachementAutoPrint(Item As Outlook.MailItem)
'Updated by Extendoffice 20230223
  Dim xFS As FileSystemObject
  Dim xTempFolder As String
  Dim xAtt As Attachment
  Dim xShell As Object
  Dim xFolder As Object, xFolderItem As Object
  Dim xFileName As String
  On Error GoTo xError
  If Item.Attachments.Count = 0 Then Exit Sub
  Set xFS = New FileSystemObject
  xTempFolder = xFS.GetSpecialFolder(TemporaryFolder)
  xTempFolder = xTempFolder & "\ATMP" & Format(Item.ReceivedTime, "yyyymmddhhmmss")
  If Not xFS.FolderExists(xTempFolder) Then
    MkDir (xTempFolder)
  End If
  Set xShell = CreateObject("Shell.Application")
  Set xFolder = xShell.NameSpace(0)
  For Each xAtt In Item.Attachments
    If IsEmbeddedAttachment(xAtt) = False Then
      xFileName = xTempFolder & "\" & xAtt.FileName
      xAtt.SaveAsFile (xFileName)
      Set xFolderItem = xFolder.ParseName(xFileName)
      xFolderItem.InvokeVerbEx ("print")
    End If
  Next xAtt
  Set xFS = Nothing
  Set xFolder = Nothing
  Set xFolderItem = Nothing
  Set xShell = Nothing
xError:
  If Err <> 0 Then
    MsgBox Err.Number & " - " & Err.Description, , "Kutools for Outlook"
    Err.Clear
  End If
Exit Sub
End Sub

Function IsEmbeddedAttachment(Attach As Attachment)
Dim xItem As MailItem
Dim xCid As String
Dim xID As String
Dim xHtml As String
On Error Resume Next
IsEmbeddedAttachment = False
Set xItem = Attach.Parent
If xItem.BodyFormat <> olFormatHTML Then Exit Function
xCid = ""
xCid = Attach.PropertyAccessor.GetProperty("http://schemas.microsoft.com/mapi/proptag/0x3712001F")
If xCid <> "" Then
    xHtml = xItem.HTMLBody
    xID = "cid:" & xCid
    If InStr(xHtml, xID) > 0 Then
        IsEmbeddedAttachment = True
    End If
End If
End Function
Hinweis: Dieser Code unterstützt das Drucken aller Arten von Anhängen, die in E-Mails empfangen werden. Wenn Sie nur Anhänge eines bestimmten Typs drucken möchten – beispielsweise PDF-Dateien –, verwenden Sie stattdessen den folgenden VBA-Code.
VBA-Code 2: Den angegebenen Anhangstyp automatisch drucken, sobald E-Mails eingehen
Sub AttachementAutoPrint(Item As Outlook.MailItem)
'Updated by Extendoffice 20230223
  Dim xFS As FileSystemObject
  Dim xTempFolder As String
  Dim xAtt As Attachment
  Dim xShell As Object
  Dim xFolder As Object, xFolderItem As Object
  Dim xFileType As String, xFileName As String
  On Error GoTo xError
  If Item.Attachments.Count = 0 Then Exit Sub
  Set xFS = New FileSystemObject
  xTempFolder = xFS.GetSpecialFolder(TemporaryFolder)
  xTempFolder = xTempFolder & "\ATMP" & Format(Item.ReceivedTime, "yyyymmddhhmmss")
  If Not xFS.FolderExists(xTempFolder) Then
    MkDir (xTempFolder)
  End If
  Set xShell = CreateObject("Shell.Application")
  Set xFolder = xShell.NameSpace(0)
  For Each xAtt In Item.Attachments
    If IsEmbeddedAttachment(xAtt) = False Then
      xFileName = xAtt.FileName
      xFileType = LCase$(Right$(xFileName, VBA.Len(xFileName) - VBA.InStrRev(xFileName, ".")))
      xFileName = xTempFolder & "\" & xFileName
      Select Case xFileType
        Case "pdf"   'change "pdf" to the file extension you want to print
          xAtt.SaveAsFile (xFileName)
          Set xFolderItem = xFolder.ParseName(xFileName)
          xFolderItem.InvokeVerbEx ("print")
      End Select
    End If
  Next xAtt
  Set xFS = Nothing
  Set xFolder = Nothing
  Set xFolderItem = Nothing
  Set xShell = Nothing
xError:
  If Err <> 0 Then
    MsgBox Err.Number & " - " & Err.Description, , "Kutools for Outlook"
    Err.Clear
  End If
  Exit Sub
End Sub

Function IsEmbeddedAttachment(Attach As Attachment)
Dim xItem As MailItem
Dim xCid As String
Dim xID As String
Dim xHtml As String
On Error Resume Next
IsEmbeddedAttachment = False
Set xItem = Attach.Parent
If xItem.BodyFormat <> olFormatHTML Then Exit Function
xCid = ""
xCid = Attach.PropertyAccessor.GetProperty("http://schemas.microsoft.com/mapi/proptag/0x3712001F")
If xCid <> "" Then
    xHtml = xItem.HTMLBody
    xID = "cid:" & xCid
    If InStr(xHtml, xID) > 0 Then
        IsEmbeddedAttachment = True
    End If
End If
End Function
Hinweise:
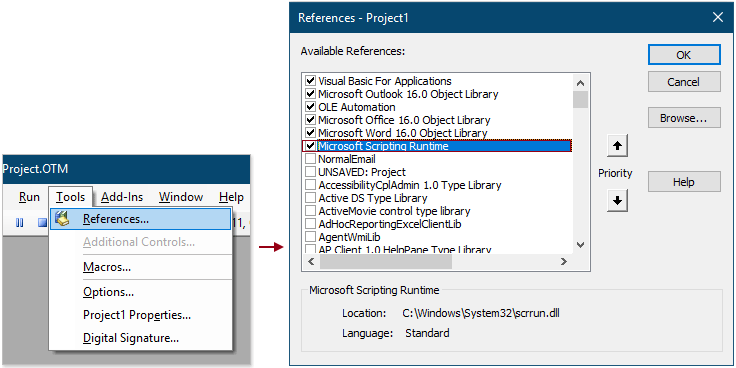
3. Klicken Sie auf Extras > Verweise. Aktivieren Sie im erscheinenden Dialogfeld Verweise – Projekt1 das Kontrollkästchen Microsoft Scripting Runtime und klicken Sie anschließend auf die Schaltfläche OK.
4. Speichern Sie den Code und drücken Sie die Tasten Alt + Q, um das Fenster Microsoft Visual Basic für Applikationen zu schließen.
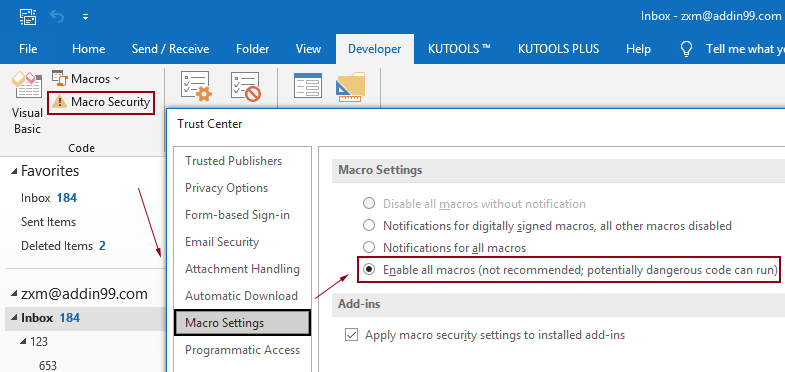
Hinweis: Stellen Sie sicher, dass die Option Alle Makros aktivieren in Ihrem Outlook aktiviert ist. Sie können diese Einstellung überprüfen, indem Sie die unten beschriebenen Schritte ausführen.
Schritt 2: Erstellen einer Regel zur Verwendung des Skripts
Nachdem Sie das VBA-Skript in Outlook hinzugefügt haben, erstellen Sie eine Regel, um das Skript unter bestimmten Bedingungen auszuführen.
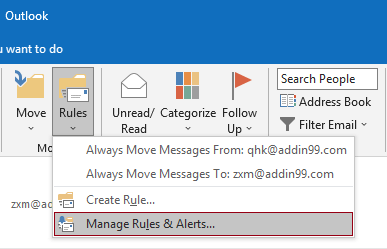
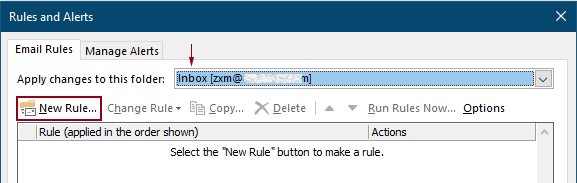
1. Wechseln Sie zur Registerkarte Start und klicken Sie auf Regeln > Regeln und Benachrichtigungen verwalten.
2. Klicken Sie im Dialogfeld Regeln und Benachrichtigungen auf die Schaltfläche Neue Regel, um eine Regel zu erstellen.
Tipp: Falls Sie mehrere E-Mail-Konten in Outlook eingerichtet haben, wählen Sie in der Dropdown-Liste Änderungen auf diesen Ordner anwenden das Konto aus, auf das die Regel angewendet werden soll. Andernfalls wird sie auf den Posteingang des aktuell ausgewählten Kontos angewendet.
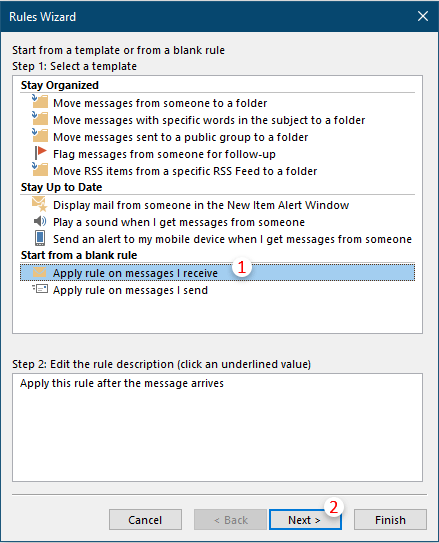
3. Wählen Sie im ersten Regel-Assistent-Dialogfeld im Feld Schritt 1 die Option Regel auf empfangene Nachrichten anwenden aus, und klicken Sie anschließend auf Weiter.
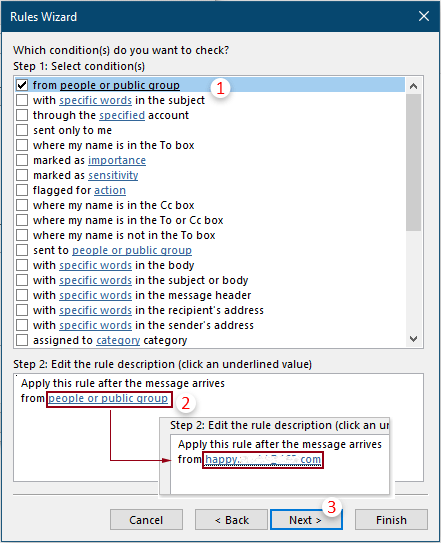
4. Im zweiten Regel-Assistent-Dialogfeld müssen Sie Folgendes tun:
5. Im dritten Regel-Assistent-Dialogfeld müssen Sie die folgenden Einstellungen vornehmen.
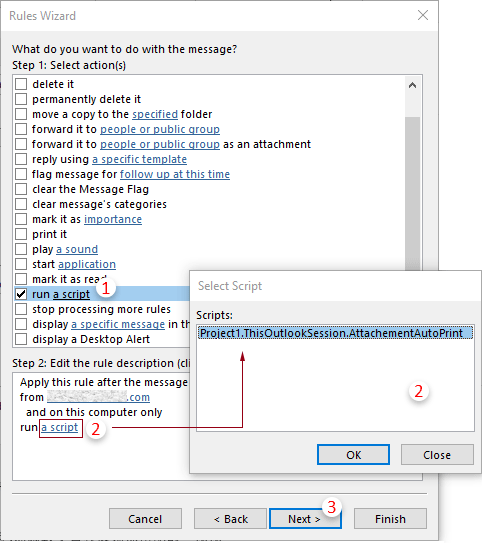
Tipp: Falls die Option „Skript ausführen“ in Ihrem Regel-Assistenten fehlt, können Sie sie mithilfe der in diesem Artikel beschriebenen Methode wiederherstellen: Fehlende Option „Skript ausführen“ in Outlook-Regel wiederherstellen.
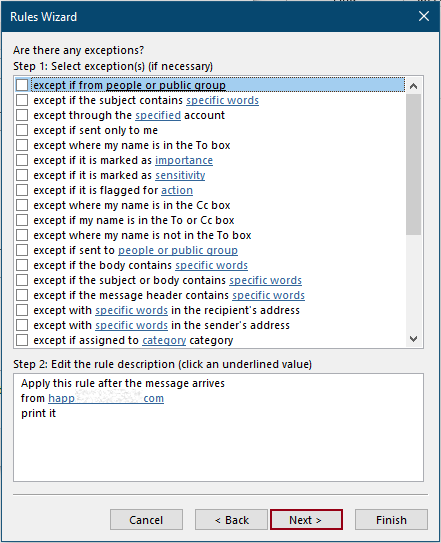
6. Anschließend erscheint ein weiteres Regel-Assistent-Dialogfeld, in dem Ausnahmen abgefragt werden. Wählen Sie gegebenenfalls Ausnahmen aus; andernfalls klicken Sie ohne Auswahl auf die Schaltfläche Weiter.
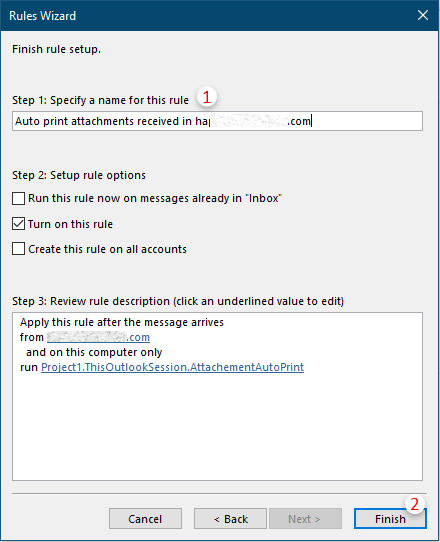
7. Geben Sie im letzten Regel-Assistent einen Namen für die Regel an, und klicken Sie anschließend auf die Schaltfläche Fertig stellen.
8. Danach kehren Sie zum Dialogfeld Regeln und Benachrichtigungen zurück. Die erstellte Regel wird dort aufgelistet. Klicken Sie auf die Schaltfläche OK, um die gesamte Einrichtung abzuschließen.
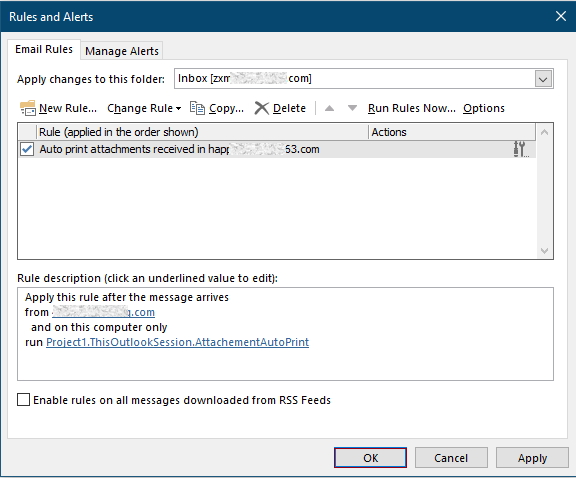
Ab sofort wird der Anhang automatisch gedruckt, sobald eine E-Mail von der angegebenen Person empfangen wird.
Verwandte Artikel
Nur Anhang/Anhänge einer E-Mail oder ausgewählter E-Mails in Outlook drucken
In Outlook können Sie E-Mails drucken – aber haben Sie schon einmal ausschließlich die Anhänge einer einzelnen oder mehrerer ausgewählter E-Mails gedruckt? Dieser Artikel zeigt Ihnen, wie’s geht.
Nur den Nachrichtenkopf einer E-Mail in Outlook drucken
Beim Drucken einer E-Mail in Outlook werden standardmäßig sowohl der Nachrichtenkopf als auch der Nachrichtentext gedruckt. In bestimmten Situationen benötigen Sie jedoch möglicherweise nur den Nachrichtenkopf – inklusive Betreff, Absender, Empfänger und weiterer Metadaten. Dieser Artikel stellt zwei praktische Lösungen dafür vor.
Einen Kalender in einem festgelegten oder benutzerdefinierten Datumsbereich in Outlook drucken
Normalerweise wählt Outlook beim Drucken eines Kalenders in der Monatsansicht automatisch den Monat aus, der das aktuell markierte Datum enthält. Möglicherweise möchten Sie den Kalender aber über einen individuellen Zeitraum drucken – etwa drei Monate oder ein halbes Jahr. Dieser Artikel zeigt Ihnen, wie’s geht.
Einen Kontakt mit Foto in Outlook drucken
Standardmäßig wird das Foto eines Kontakts beim Drucken in Outlook nicht mitgedruckt. In bestimmten Situationen wirkt ein Kontakt jedoch deutlich eindrucksvoller, wenn er zusammen mit seinem Foto gedruckt wird. Dieser Artikel zeigt Ihnen praktische Umgehungslösungen dafür.
Einen Ausschnitt einer E-Mail in Outlook drucken
Angenommen, Sie erhalten eine E-Mail und möchten nur einen bestimmten Ausschnitt des Inhalts – nicht die gesamte Nachricht – drucken. Wie gehen Sie in diesem Fall vor? Tatsächlich können Sie diese Aufgabe in Outlook mithilfe von Internetbrowsern wie Firefox oder Internet Explorer erledigen. Im Folgenden erklären wir Schritt für Schritt, wie das funktioniert. Beachten Sie dazu bitte die nachstehenden Anleitungen.
Beste Office-Produktivitätswerkzeuge
Erleben Sie das komplett neue Kutools für Outlook mit 100+ unglaublichen Funktionen!Jetzt zum Download klicken!
📧E-Mail-Automatisierung: Automatische Antworten (verfügbar für POP und IMAP) / E-Mails zeitgesteuert versenden / Beim Senden automatisch CC/BCC basierend auf Regeln hinzufügen / Automatische Weiterleitung (Erweiterte Regeln) / Automatische Grußformel einfügen / Mehrfachadressierte E-Mails automatisch in Einzelnachrichten aufteilen …
📨E-Mail-Verwaltung: E-Mails zurückrufen, Betrugs-E-Mails anhand von Betreffzeilen und weiteren Kriterien blockieren, doppelte E-Mails löschen, Erweiterte Suche, Ordner organisieren …
📁Anhänge Pro: Stapelweise speichern / Stapelweise lösen / Stapelweise komprimieren / Automatisch speichern / Automatisch abtrennen / Automatische Komprimierung …
🌟Oberflächenzauber:😊Noch mehr hübsche und coole Emojis/Benachrichtigung bei wichtigen eingehenden E-Mails/Outlook minimieren statt schließen...
👍Ein-Klick-Wunder: Allen mit Anhängen antworten / Anti-Phishing-E-Mails / 🕘Aktuelle Uhrzeit der Absender-Zeitzone anzeigen...
👩🏼🤝👩🏻Kontakte & Kalender:Stapelweise Kontakte aus ausgewählten E-Mails hinzufügen/Eine Kontaktgruppe in einzelne Kontakte aufteilen/Geburtstagserinnerung entfernen...
Nutzen Sie Kutools in Ihrer bevorzugten Sprache – mit Unterstützung für Englisch, Spanisch, Deutsch, Französisch, Chinesisch und über 40 weitere Sprachen!


🚀 Ein-Klick-Download – Holen Sie sich alle Office-Add-Ins
Stark empfohlen: Kutools for Office (5-in-1)
Mit einem Klick fünf Installationsprogrammegleichzeitig herunterladen –Kutools für Excel, Outlook, Word, PowerPointund Office Tab Pro.Jetzt zum Download klicken!
- ✅Ein-Klick-Komfort: Laden Sie alle fünf Installationspakete mit nur einem Klick herunter.
- 🚀Bereit für jede Office-Aufgabe: Installieren Sie die Add-Ins, die Sie brauchen – genau dann, wenn Sie sie benötigen.
- 🧰Enthalten: Kutools für Excel / Kutools für Outlook / Kutools für Word / Office Tab Pro / Kutools for PowerPoint